

Hey! If you are new to product design or manufacturing, you have probably heard the term injection molding. It is one of the most common ways to make plastic parts in large numbers. Many everyday items like phone cases, bottle caps, car dashboard pieces, and toys are made with this process. In this article, I explain what injection molding is, the basic principles behind it, the full workflow, and the core steps in simple, easy-to-understand words. By the end, you will have a clear picture of how it works and why it is so popular.
What Is Injection Molding?
Injection molding is a manufacturing process that turns plastic material into finished parts. You take small plastic pellets, heat them until they become a thick liquid, and then push the liquid into a metal mold under high pressure. Once the plastic cools and becomes solid again, you open the mold and take out the ready part.
This method is fast, repeatable, and great for making thousands or even millions of identical parts. It is used for both simple items and complex products with fine details. The process is very efficient because almost all the plastic ends up in the final part, with very little waste.
Many companies choose injection molding because it can produce parts with excellent surface finish, tight tolerances, and consistent quality. It works with many different types of plastic, from cheap everyday materials to strong engineering plastics.
Basic Principles of Injection Molding
The whole process is based on a few simple ideas. First, plastic can change from solid pellets to a flowable liquid when heated, and then back to solid when cooled. This property is called thermoplastic behavior.
Second, high pressure is needed to push the melted plastic into every corner of the mold so the part fills completely and has sharp details.
Third, the mold must be strong enough to handle the pressure and precise enough to create the exact shape you want. The mold is usually made of steel or aluminum and consists of two main halves that come together.
The machine that does the work is called an injection molding machine. It has a clamping unit that holds the mold closed and an injection unit that melts and pushes the plastic.
These principles allow the process to run quickly and produce parts with high accuracy every time.
Main Components Involved in the Process
Before we go into the workflow, let’s quickly look at the key parts that make injection molding possible.
- Plastic material: Comes as small pellets or granules.
- Injection molding machine: Heats, melts, and injects the plastic.
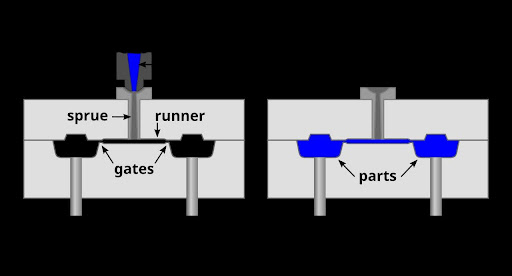
- Mold: The custom tool that gives the part its shape. It includes the cavity (the empty space where plastic flows) and the core.
- Cooling system: Channels inside the mold that help the plastic cool down evenly and quickly.
- Ejection system: Pins or plates that push the finished part out of the mold.
Each of these components must work together smoothly. If you want to understand the different parts of the mold in more detail, you can view more.
The Complete Workflow of Injection Molding
The injection molding workflow follows a clear sequence that repeats for every cycle. A typical cycle takes between 10 and 60 seconds, depending on the size and complexity of the part.
Here is how it usually goes:
- Mold closing: The two halves of the mold come together and clamp shut with high force.
- Plastic melting: Plastic pellets are fed into the machine’s barrel and heated by heaters and screw movement until they melt.
- Injection: The molten plastic is pushed forward by the screw and injected into the mold cavity under high pressure.
- Packing and holding: Extra plastic is pushed in to compensate for shrinkage as the material starts to cool.
- Cooling: The plastic inside the mold cools and solidifies. The cooling time is often the longest part of the cycle.
- Mold opening: The mold halves separate.
- Part ejection: The finished part is pushed out of the mold by ejector pins.
- Cycle repeat: The mold closes again and the next cycle begins.
This workflow is highly automated in modern factories, so one machine can run 24 hours a day with minimal human help.
Core Step 1: Material Preparation
Everything starts with choosing and preparing the right plastic. You select a material based on the part’s needs – strength, flexibility, heat resistance, or appearance. Common plastics include polypropylene (PP), ABS, polycarbonate (PC), and nylon.
The plastic pellets must be dry before use. Many plastics absorb moisture from the air, which can cause defects like bubbles or weak spots. You often use a drying machine to remove the moisture.
Once dry, the pellets are loaded into a hopper on top of the injection molding machine.
Core Step 2: Melting the Plastic
Inside the machine, the pellets move forward through a heated barrel by a rotating screw. The combination of heat and friction melts the plastic into a thick, uniform liquid. The temperature is carefully controlled – usually between 180°C and 300°C depending on the material.
The screw also mixes the melt so it has the same temperature and consistency everywhere. When enough melted plastic is ready, the screw stops rotating and starts moving forward like a plunger to inject the material.
Core Step 3: Injection and Packing
The molten plastic is forced into the closed mold at high speed and pressure. Typical injection pressures range from 500 to 2000 bar. This high pressure ensures the plastic fills every detail of the mold, including thin walls and small features.
After the cavity is filled, the machine applies a lower holding pressure for a short time. This packing phase pushes a little more material in to compensate for the natural shrinkage that happens as the plastic cools.
Core Step 4: Cooling and Solidification
Once the plastic is inside the mold, it begins to cool. Cooling channels built into the mold circulate water or oil to remove heat quickly and evenly. Proper cooling is critical because it affects the final quality, shrinkage, and cycle time.
If the part cools too fast or unevenly, it can warp, shrink too much, or develop internal stresses. The cooling time usually makes up more than half of the total cycle time.
Core Step 5: Ejection and Part Removal
When the part is solid enough, the mold opens and ejector pins push the part out. The part may fall into a box or be picked up by a robot. Sometimes the part still has small runners or sprues attached, which are trimmed off later.
After ejection, the mold closes again and the next cycle starts. The ejected part is then inspected, trimmed, and moved to the next stage, such as assembly or packaging.
Advantages of the Injection Molding Process
Injection molding has many benefits:
- High production speed and efficiency
- Ability to make complex shapes with fine details
- Excellent surface finish and consistent quality
- Low cost per part when producing large quantities
- Wide range of materials and colors available
- Minimal waste compared to other methods
These advantages make it the first choice for many industries including automotive, electronics, medical, and consumer goods.
Things to Consider When Using Injection Molding
Even though the process is straightforward, a few points need attention. The mold itself is the biggest upfront cost, so good design from the beginning is important. You also need to think about wall thickness, draft angles, and material shrinkage to avoid defects.
Working with an experienced manufacturer helps you avoid common mistakes and get the best results.
If you are looking for professional support in plastic part production, check out MoldPartner. They provide reliable services for injection molding projects of all sizes.
Final Thoughts
Injection molding is a powerful and efficient manufacturing process that turns plastic pellets into precise, high-quality parts. By understanding the basic principles, the overall workflow, and the core steps – material preparation, melting, injection, packing, cooling, and ejection – you can better design your products and communicate with manufacturers.
The process may look complicated at first, but once you see the clear sequence, it becomes much easier to understand. Whether you are making a simple prototype or planning mass production, injection molding offers speed, accuracy, and cost savings that few other methods can match.
Take your time to learn the details, choose the right material, and work with a good partner. With these basics, you are well on your way to successful plastic part production.


